Showing posts with label manicure. Show all posts

Wednesday, May 8, 2013

Girls just wanna have fun!

Last Saturday marked a huge achievement in my family.  It was the 50th wedding anniversary of my parents.  This is truly an incredible accomplishment, so we had to commemorate it by having family photos done by a professional photographer. 
 
My nieces wanted their nails done for the occasion and seeing as I had been having some fun myself with the funky nails tattoos I had been sent to review by Fake Tattoos, I offered to give them all cool designs on their little nails.
 
Nr. 1 in Europe regarding fake tattoos for both nails and skin - FAKE TATTOOS on FB
 
 
Needless to say, they went crazy when they saw all the different choices and wanted tattoos on each of their fingers.  It wasn't an easy decision, but here's the final look they chose....
 
Meg is a die-hard nail polish fanatic and absolutely loves nail art too.  When she heard I had tattoos to apply, she simply couldn't wait to try them. 
 
She decided on moustaches and bows.
 
Kyra chose a mixture of images.  You can see a palm tree, bows and a small ice-cream cone on her nails.  Very proud to show off her glammed-up talons!
 
These girls could have easily applied the nail tattoos themselves; they are so simple to work with.  The only problem might have been positioning them.  These nails were pretty tiny, and we had to choose the smaller tattoos for a better fit on their nails.
 
Last, but not least, Jada chose an array of designs:  a jester's hat, a bow, an ice-cream cone and a red lady bug.  They all looked awesome!
 
We finished off their simple manis with a layer of top coat to help seal the tattoo and promote longer wear. 
 
Top Coat shown here is from the ASK Cosmetics Nailwear line.
 
More to come on Fake Tattoos.....
 
Thanks for stopping by and til next time,  Lisa M.


Friday, May 3, 2013

Much better than the real thing!

 I've always thought about getting a tattoo.  However, the idea of something so permanent on my body was just too daunting.  I've even considered getting a little one in some inconspicuous spot, but it simply hasn't happened.
 
Well, I was thrilled when I was contacted by the company FAKE TATTOOS not only because I find the idea ingenious, but also because they sent me nail tattoos to try out.  This is a brilliant way of decorating your nails a little bit more than with just colour.
 
So here we go with Part 1 of my nail tattoo review........
 
Photo 1:  The tattoos in the original packaging.


About the company:  FAKE TATTOOS has reached #1 position within Europe regarding temporary tattoos, but they sell to the entire world.  They work with several famous guest designers, so most of their tattoos cannot be found anywhere else - they are originals.  They focus on fast delivery and 100% customer satisfaction..... and ..... they loooooove temporary tattoos!  (Text taken from the original letter and modified slightly for this blog post.)
 
Photo 2:  "Miss Minty" & "Bubblegum" by GOSH and the first sheet of FAKE TATTOOS entitled Hearts & Bow Design Order #CT615744.
 
About the fake tattoos:  The tattoos are easy to apply and last 3 - 10 days depending on your skin type.  The tattoos are FDA tested and totally non-toxic.  (Text provided by the company and slighty modified for this blog post.)
 
Photo 3:  Instructions for the correct application of the nail tattoos can be found on the back of each sheet of tattoo designs.

Photo 4:  GOSH shades "Miss Minty" and "Bubblegum" on alternating fingers with hearts from the Hearts & Bow Design.
 
This was my very first application of nail tattoos.  Apart from the sloppy job I did on my pinky and the fact that these two shades are becoming increasingly hard to work with, I was very pleased with the initial attempt at tattooing.
BTW -   I am really disappointed with the quality of these two, particularly as I have two other shades by GOSH, namely Berry Me and Blue Balloon, which are absolute dreams to work with and apply.
 
In any case, nail tattoos are a must-have item for every nail enthusiast.  These designs were super easy to apply.  It hardly takes any time and you are left with an amazing result.
 
 
Admittedly, I needed a few tries before I got better at lining up the tattoos on my nails so they were even.  Proper and accurate placement of these little pictures is harder than you would imagine on small finger nails such as mine, but practice makes perfect.

It is extremely fun to pick and choose the design you want with an appropriate shade of polish.  Even one tattoo on one nail would look fantastic and add something special to your manicure. 
 
So look them up and stay tuned for Part 2 of the nail tattoo series.
 
FAKE TATTOOS on Facebook - click here
 
on Twitter @fake_tattoos
(FYI - they post all their big VIP discount codes on FB and Twitter)


Wednesday, March 20, 2013

QVC Beauty Event on March 24th

I've got great news for all the QVC US shoppers out there.  On Sunday March 24th  QVC US is offering free shipping & handling on the following items/kits by ASK Cosmetics:

A-62260 - 1 bottle of TIPS for Toes

A-62259 - 2 bottles of Revival Nail Polish Remover


A-69605 - 2 x Contour Nail Files in a set
 
A-00563 TIPS 5 Piece Ultimate Manicure Kit
 

A-1859    2 bottles of the Revival Skin Conditioning Milk
 
For more information on these products, check out this page for brief product descriptions and to find out more about the brand, ASK Cosmetics Inc. of Canada.

All these kits are available on QVC's Beauty - TIPS Nail Care website.  These products and all the details about ordering can be found right here.
 
 
Take advantage and save some money on QVC this Sunday, March 24th. 
 
See you soon,  Lisa M.


Thursday, March 14, 2013

The Luck of the Irish - St. Paddy's Day Mani

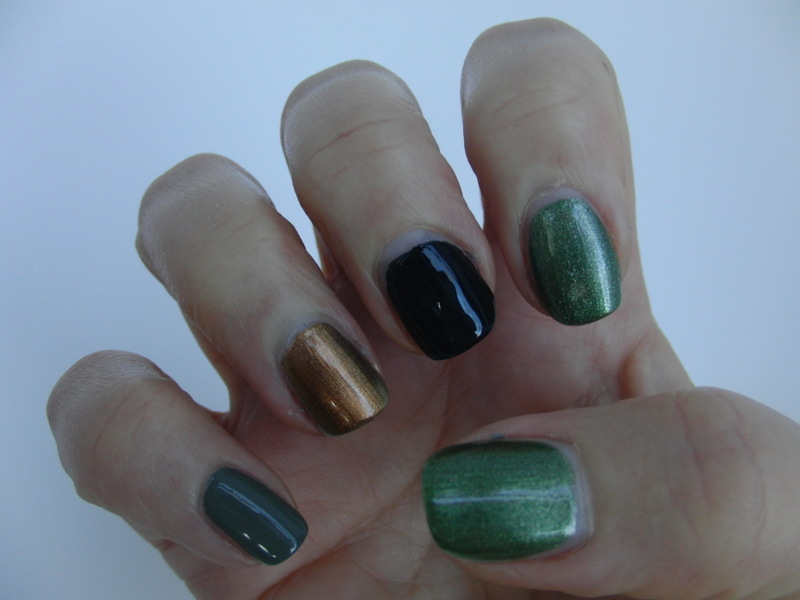
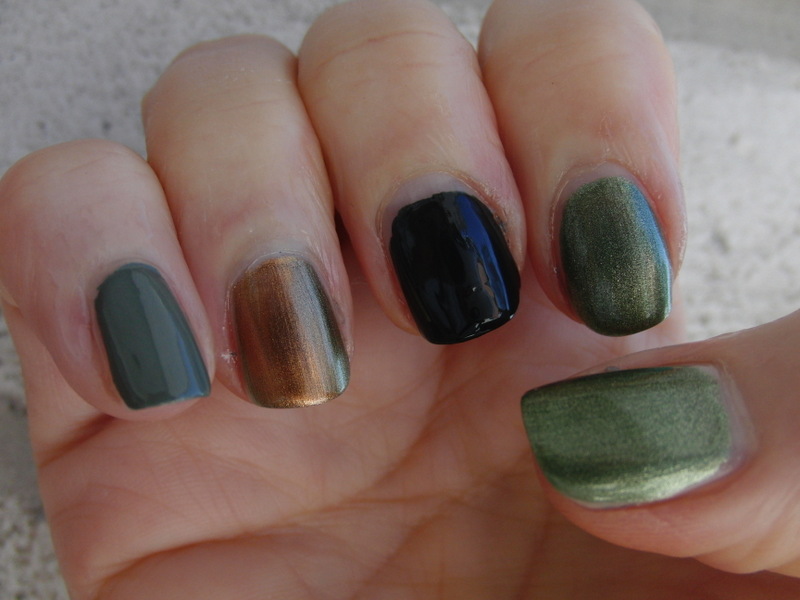
I was very surprised to find a number of "greenish" shades in my polish assortment.  Typically I wouldn't buy green polish, but these must have caught my eye somehow on my shopping trips.
 
Which one would you choose as a St. Patrick's Day manicure?

From left - right:  "Rags to Riches" by Rimmel London, "Stylenomics" by Essie, "Plume" by Sally Hansen and "Spanish Moss" by Revlon.
 
Sorry, they are hard to see in this shot.  I was playing around with my new camera and didn't seem to get the lighting quite right.  Will do better next time!
 
Thumb + Index finger have "Rags to Riches", Middle finger has "Stylenomics", Ring finger has "Plume" and Pinky finger has "Spanish Moss".  These are all 2 coats with indoor lighting no flash.


Well, there they are.....but not all of them really look like green shades. 
 
Your choice for St. Paddy's Day would be......
 
Thanks for stopping by.  Til next time,  Lisa M.


Sunday, February 20, 2011

NOTW: The 50's Red Manicure... vamped up!

It's Sunday once again and that means another nail tutorial! This time I opted for something plain but classy... the 50's Manicure.  In the 1950's, many women used to wear another version of the classic red manicure.  It is essentially the same look, except that the half-moons at the base of each nail are left unpainted.  Instead of the traditional red, I have used a darker nail polish to achieve this look.  The only requirement to get this look yourselves is a steady hand! Let's get started! 

1. Apply a clear base coat all over the nails and leave to dry.

2. Select the colour you want and start painting a stripe of nail polish down the centre of the nail, starting just above the lunula (half-moon) at the base of your nail.

3. Apply a stripe of nail colour to each side of the nail, following the line of the half-moon.  Apply a second coat if desired.

4. Finish the manicure off with a coat of clear top-coat all over the nail.


Blogger Templates

Sunday, February 13, 2011

NOTW: Zip open some girly fun!... Valentine's Day Tutorial #3

Good morning make-up cakes :) hope you've all bought your gifts for the Valentines in your lives and have everything planned for tomorrow :) However, Valentine's Day is not only for loved-up people so for those ladies out there who are single, I did the last Valentine manicure with you in mind :) I know some of my girly friends who are single and go out together on Valentine's Day for some girly fun without boys and I thought I would steer away from hearts and roses and go for something fun! And what better way is there to represent fun on your nails than by wearing glitter? So let's get started on this fun manicure!

1. Prep your nails with a clear base coat and follow with a thin coat of a nude pink polish to prevent your nails from being stained with the darker pink polish.

2. Apply two coats of a nice bright pink polish on all your nails bar the ring fingers and any other nails you want to make the design on.  If you are going to do the design on all your nails, skip this step altogether.


3. For the design, you will need the same pink you used on the other nails, a glittery pink and a black striper polish.

a) Start by drawing a little upside down triangle at the tip of the nail with the glitter polish and leave to dry.
b) Paint the remaining areas of the nail on the sides of the triangle with the bright pink polish and leave to dry thoroughly.
c) To draw the zips, start from the tip of the triangle that is facing downwards and draw little horizontal strokes with the black polish, working your way down the length of the nail.  Do the same on the sides of the triangle to make it look as if you are opening up the zip!
d) Finally, draw a little circle just under the tip of the triangle and place a pink rhinestone in the middle to resemble the actual zipper.

4. Finish with a clear top coat and you're done!


I hope you liked this nail design idea and that you will try it out yourselves! If you do, please do link me to your photos as I love to see your work :) Have fun tomorrow and Happy Valentine's Day to all!

Blogger Templates
Blogger Templates

Monday, December 13, 2010

Review: Ms. Manicure Call Your Buff 6-way buffer

I bought this buffer about a year ago because my Body Shop one wasn't good for use anymore.  I really like the back of the protective pouch where you get the instructions:


It's kinda cute don't you agree? As you can tell from the title, the buffer has 6 'sides' to it but honestly I don't see the necessity of this. Let's take a look at them individually:

1. File Away ~ I don't like the grit on this side as it feels rather smooth compared to other nail files so I definitely don't use this to file my nails.

2. Shape Up ~ Again, this is too smooth to shape your nails and besides, I shape my nails with my nail file as I go along.

3. Tidy Those Tips ~ This is the first side I like from this buffer! You know when you file your nails and you get some left-over hanging bits from the tips of your nails? This side clears them up for you!


4. Smooth It Down ~ This side is supposed to remove ridges (those fine vertical lines along the nails) and stains from the nails, but I have never seen any difference.


5. Buff To Beautiful ~ I like how this side really buffs the nails to a satiny-smooth feel therefore prepping them for a smooth polish application.

6. Polish Me Perfect ~ This side gives a shine to the nails and makes them look as if you have applied a layer of clear polish.  However, to me this has no use as I always polish my nails.

I can't remember the exact price for this but it wasn't expensive for sure but I don't think I will buy it again as I don't reach for it that often and to me, it would have sufficed to have the tip tidying side and the buffing side. However, should the nail file have the correct grit, it would have been even better. 

Blogger Templates
Blogger Templates

Tuesday, July 13, 2010

Review: Revlon Cuticle Moisture Oil 985

In this post I will be reviewing one amazing product...Revlon Cuticle Moisture Oil 985.


It is only recently that I started using a cuticle oil because I thought that just massaging hand cream into the cuticles will keep them soft. The hand cream did keep them soft but it did not however provide the nutrients a cuticle needs to perform its function effectively i.e. protecting the nail. Another factor that kept me from purchasing a cuticle oil is the fact that I don't have dry cuticles.

So, you may ask, how come did I start using it? And the answer to that is simply...I had to buy it for a course I was attending since we were having a manicure/pedicure practical and it was included in the list of this we needed!

After I've used the oil for a couple of times, I noticed that my nails grew much longer and stronger. At this point I was thinking how could I have not used such a product for a long time??? Anyway, let's see how the product looks...


The picture shows how the product is presented. It looks like a clear nail varnish except that it is more fluid, doesn't smell and evaporates quickly after massaging into the cuticle.


The applicator is also identical to that of a nail polish and it makes it easier to apply the product without messing up your manicure. However, there are various other applicators and formulations such as roll-ons and creams depending on the state of your cuticles and also the method you are most comfortable working with.

As I said earlier, I found the product really works wonders and I definitely give it my thumbs up and I swear I will never ever be caught without it ;P

Finally here is a picture of where to apply the oil:


I hope you enjoyed this review and in the meantime stay beautiful :)

Lara xoxo

Monday, July 12, 2010

Manicure and Pedicure Procedure


Following my Full Skin Care Routine, here I am giving a detailed procedure to carry out an at home manicure and pedicure whenever your hands and feet need a pick-me up. Personally, I do a manicure once a week and a pedicure twice a week.

Manicure


1. Sanitize your hands with antiseptic gel/wipes/spray.

2. Remove your old nail polish and asses your nails to decide the shape and if they require a special treatment (ex. rub a slice of lemon to remove nail polish stains; immerse nails in olive oil for 10 minutes to strengthen them; etc...). It is best if you use an acetone-free nail polish remover since acetone tends to excessively dry the nails of their natural oils and hence weaken them.

3. File the nails in the desired shape. You can get an idea of different nail shapes from the picture below:


4. Immerse one hand in a bowl filled with warm water for 5 minutes. This will soften the hands on your skin and prepare them for the treatments to follow. You can add 3 drops of your favourite essential oil or bubble bath.

5. Dry your hand and repeat step 4 for the other hand. (There is no need to add more essential oil/bubble bath).

6. Push the cuticles back with an orange stick or wooden/stainless steel cuticle pusher. DO NOT CUT YOUR CUTICLES. They are there to protect the nails from bacterial and fungal infections.

7. Apply a hand/body scrub all over the palms and inner arms. Rinse off with warm water after 5 minutes.

8. Using your favourite hand cream or body lotion as a massage medium, massage your hands for 10 minutes to relax the muscles.

9. Wipe nails with some acetone-free nail polish remover to remove lotion residues since these will not permit the nail polish to adhere to the nail.

10. Apply one coat of base coat. There is a variety of base coats to suit all types of nail conditions, for example, ridge fillers, nail strengtheners and hardeners and clear base coats. Choose one which suits your nails the most.

11. Apply two coats of your desired nail varnish. Allow drying time in between coats.

12. If you are ready from painting your nails, doing nail art, etc..., apply one coat of a glossy, glittery or matte top coat (which ever you please) to protect your manicure and make it last longer.

13. Finish off by applying some cuticle oil to the cuticles and massage it until it is absorbed.


Pedicure


1. Perform steps 1 & 2 as for a manicure.

3. Immerse feet in a basin with warm water to soften them and the nails to make it easier to trim them. Take them out and dry them after about 5 minutes.

4. Trim the nails straight across to prevent ingrown toe-nails.

5. Do steps 6 - 13 as for a manicure but ***remember to use toe separators when applying polish to prevent smudging***

Also, you can use a foot rasp or pumice stone to remove hard skin after applying the scrub and before the body lotion. If you have treatment creams like for example a callus reducer, apply it before going to bed after washing your feet, put on a pair of old socks and sleep in them... by morning your feet will be baby-soft!

The right tools for the job!

Here is a list of the basic things you will need to do an at-home manicure and pedicure:

- Antiseptic spray/gel/wipes
- Nail files (not the steel ones as these are too harsh for natural nails)
- Acetone-free nail polish remover
- Bowl/basin
- Bubble bath/essential oils
- Cuticle pushers
- Hand scrub
- Hand cream
- Foot rasp/pumice stone
- Cotton discs/balls/buds
- Toe separators
- Base coat
- Nail polishes
- Top coat
- Cuticle oil

And here is a picture of some of my tools (nail art brushes and stamping image plates are also included as well as other gems and decorations):